Agent Creation Flow:
Step 1: Define Your Objective (Context Gathering)
Begin by describing what you want to extract from your contracts:
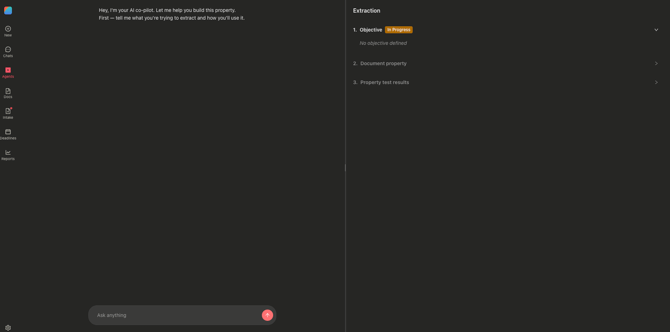
- Navigate to the Agents page from the left-hand menu
- Click "Create Agent" to open the agent builder
- The AI assistant will ask questions about your extraction needs:
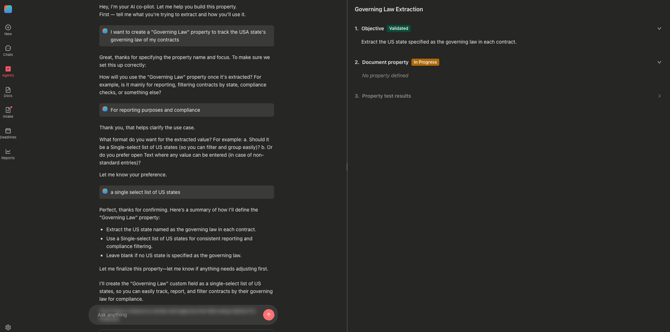
"Hey, I'm your AI co-pilot. Let me help you build this property.
First — tell me what you're trying to extract and how you'll use it." - Provide clear, specific answers to help the AI understand your requirements
- Once sufficient context is gathered, the "Objective" section displays a "Validated" badge
- Proceed to Step 2.
Best Practice Tips:
- Be specific about the property name (e.g., "Governing Law" rather than just "law")
- Describe the expected format (e.g., "State name as text" or "Date in MM/DD/YYYY format")
- Explain context (e.g., "Extract renewal date to track contract lifecycle")
Step 2: Configure Document Property
The system checks for existing similar properties in your account:
If Matching Property Found:
- Review the existing property displayed
- Choose one of three options:
- Use existing property (recommended to maintain consistency)
- Modify the existing property definition
- Create a new property with different specifications
If No Match Found:
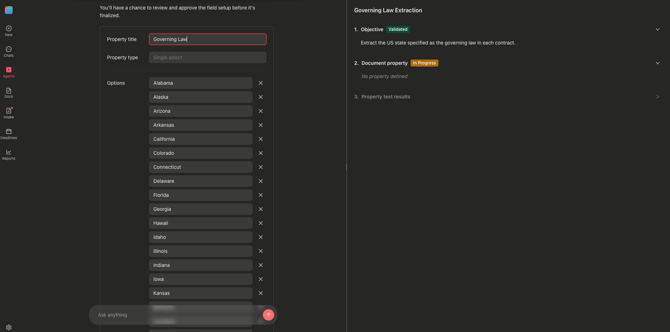
- The AI generates a property suggestion based on your context
- Review the PropertyCard displaying:
- Property name
- Property type (text, date, number, multi-select, etc.)
-
- Values (for select/multi-select types)
- Edit any field as needed
- Click "Validate option" to save
- The property is immediately created in your account and available in Settings > Properties
- The "Document Property" section displays a "Validated" badge
- Proceed to Step 3
Step 3: Test Extraction (Property Test Results)
Validate your agent's accuracy before deployment:
- The AI asks: "Which contracts should I test on?"
- Browse and select from existing contracts (up to 10 documents maximum)
- The system runs extraction on your selected contracts
- Review the preview results table showing:
- Contract Title
- Extracted Value
- An information icon showing the extraction rationale
- A direct to the extracted document for additional review
- AI Assistant will ask: "Are you satisfied with these extraction results and ready to save your agent?" - If yes, the agent will be ready for creation
After Creation:
- Agent saved with Status = "Draft"
- Agent appears in the Agents table immediately
- Confirmation message: "Agent created! Configure scope and trigger from the Agents table."
- The property is still available in your Properties menu
- Navigate to the Agents table to configure deployment scope and activate
Important Notes:
- Agents remain in "Draft" until deployment scope is configured
- Test results are saved with your agent for reference
- You can return to edit configuration at any time from the Agents table
- Maximum 10 documents for testing to ensure focused validation
- Properties created during agent setup are immediately available across Concord
Common Use Cases:
- Extract governing law from contracts
- Identify renewal dates for lifecycle management
- Pull payment terms for financial tracking
- Extract compliance clauses for risk assessment
- Capture custom fields specific to your business needs